He estado probando los componentes
 MITOV
MITOV y he quedado asombrado con lo que pueden hacer, tienen un nivel de abstracción muy alto, con pocas instrucciones se pueden realizar programas complejos (algo parecido al Livebinding de Delphi) lo que a los programadores seguro nos facilitará mucho el desarrollo de software.
En palabras de Boian Mitov, propietario y CEO de Mitov. Software. "Estos componentes ofrecen una combinación única de compilación multiplataforma nativa y características avanzadas de lenguaje moderno como RTTI avanzado por esto Delphi ha permitido implementar componentes de inteligencia artificial multiplataforma potentes y de alto rendimiento".
Jim McKeeth, jefe de desarrollo e ingeniero de Embarcadero dijo "Me encanta que IntelligenceLab de Mitov Software tome algo tan complejo como las redes neuronales y la inteligencia artificial y lo haga accesible a través de componentes reutilizables, ahora todos nuestros desarrolladores pueden agregar redes neuronales avanzadas y otros clasificadores de IA a sus aplicaciones multiplataforma".
La licencia es gratuita para uso educativo y no comercial.
Seguidamente les mostraré como se hace un programa de reconocimiento facial utilizando los componentes basados en inteligencia artificial de Mitov.
Primero tenemos que descargarnos el paquete "
Intelligence lab" desde
aquí (IntelligenceLab_VCL_7.8.2.288.zip)
Lo guardamos en una carpeta, lo descomprimimos y ejecutamos el setup.exe, aquí hay que tener paciencia ya que es un archivo de casi 2 Gb.
Nos pedirá que tipo de licencia tenemos: free, comercial, with source code, etc...
Pulsamos aceptar y si no hay ningún problema en la instalación tendremos en el
IDE los componentes de este pack.
Creamos un nuevo proyecto y añadimos el componente
ILRadialBasisFunctionNetwork
Del cual sólo tenemos que modificar la propiedad
MaxInfluencefield = 300
En función de este valor tendremos una mayor o menor precisión en el reconocimiento de caras.
Las imágenes de prueba las guardamos en el carpeta "
faces" y las dividimos en 2 grupos uno para el
entrenamiento de la red y otro para hacer un
test en el que verificaremos la precisión del reconocimiento de las caras.
Hay 9 fotos por persona y en total hay 40. Todas las fotos se almacenan en la carpeta "Face"
Para entrenar ponemos un
tButton en nuestro programa con el siguiente código:
procedure TForm1.TrainButtonClick(Sender: TObject);
var
I : Integer;
J : Integer;
K : Integer;
ABitmap : TBitmap;
AFeaturesBuffer : ISLRealBuffer;
AInPtr : PByte;
AOutPtr : PReal;
AItem : TListItem;
begin
ABitmap := TBitmap.Create();
ProgressBar1.Max := 40;
AFeaturesBuffer := TSLRealBuffer.CreateSize( 32 * 32 );
ListView1.Items.BeginUpdate();
for I := 1 to 40 do
begin
for J := 1 to 9 do
begin
ABitmap.LoadFromFile( '.\Faces\Train_' + IntToStr( I ) + '_' + IntToStr( J ) + '.bmp' );
ImageList1.Add( ABitmap, NIL );
AItem := ListView1.Items.Add();
AItem.ImageIndex := ImageList1.Count - 1;
AItem.Caption := IntToStr( I );
AInPtr := ABitmap.ScanLine[ ABitmap.Height - 1 ];
AOutPtr := AFeaturesBuffer.Write();
for K := 0 to AFeaturesBuffer.Size - 1 do
begin
AOutPtr^ := AInPtr^ / 256;
Inc( AOutPtr );
Inc( AInPtr );
end;
ILRadialBasisFunctionNetwork1.Train( AFeaturesBuffer, I );
end;
ProgressBar1.Position := I;
end;
ListView1.Items.EndUpdate();
ABitmap.Free();
RecognizeButton.Enabled := True;
TrainButton.Enabled := False;
TrainLabel.Caption := IntToStr( ILRadialBasisFunctionNetwork1.Neurons.Count ) + ' Neurons used.';
ILRadialBasisFunctionNetwork1.SaveToFile('redneuro nal1');
end;
Al final del entrenamiento se crea el fichero "redneuronal1" que contiene todas las características y pesos de la red entrenada.
Una vez que hemos entrenado la red hay que probar su fiabilidad.
Para ello colocamos otro
tButton en nuestro proyecto y lo primero que hacemos es cargar la red con la instrucción:
ILRadialBasisFunctionNetwork1.LoadFromFile('redneu ronal1'); El código que reconoce las imágenes de test es el siguiente:
procedure TForm1.RecognizeButtonClick(Sender: TObject);
var
I : Integer;
K : Integer;
ABitmap : TBitmap;
AFeaturesBuffer : ISLRealBuffer;
AInPtr : PByte;
AOutPtr : PReal;
AItem : TListItem;
begin
ILRadialBasisFunctionNetwork1.LoadFromFile('redneu ronal1');
FTotalCount := 0;
FErrorCount := 0;
ABitmap := TBitmap.Create();
ProgressBar1.Max := 40;
AFeaturesBuffer := TSLRealBuffer.CreateSize( 32 * 32 );
ListView2.Items.BeginUpdate();
for I := 1 to 40 do
begin
FExpectedID := I;
ABitmap.LoadFromFile( '.\Faces\Reco_' + IntToStr( I ) + '.bmp' );
ImageList1.Add( ABitmap, NIL );
AItem := ListView2.Items.Add();
AItem.ImageIndex := ImageList1.Count - 1;
AInPtr := ABitmap.ScanLine[ ABitmap.Height - 1 ];
AOutPtr := AFeaturesBuffer.Write();
for K := 0 to AFeaturesBuffer.Size - 1 do
begin
AOutPtr^ := AInPtr^ / 256;
Inc( AOutPtr );
Inc( AInPtr );
end;
ILRadialBasisFunctionNetwork1.Predict( AFeaturesBuffer );
if( FResultCathegory I ) then
begin
if( FResultCathegory = 0 ) then
AItem.Caption := 'Error - Can''t recognize'
else
AItem.Caption := 'Error - Expected:' + IntToStr( I ) +
' recognized as: ' + IntToStr( FResultCathegory ) + ' Distance: ' + FloatToStr( FDistance );
end
else
AItem.Caption := 'Correct: ' + IntToStr( I ) + ' Distance: ' + FloatToStr( FDistance );
ProgressBar1.Position := I;
end;
ListView2.Items.EndUpdate();
ABitmap.Free();
RecognizeLabel.Caption := IntToStr( FErrorCount ) + ' errors of ' + IntToStr( FTotalCount ) + ' faces - ' + FloatToStr( ( FTotalCount - FErrorCount ) * 100 / FTotalCount ) + '% correct';
end;
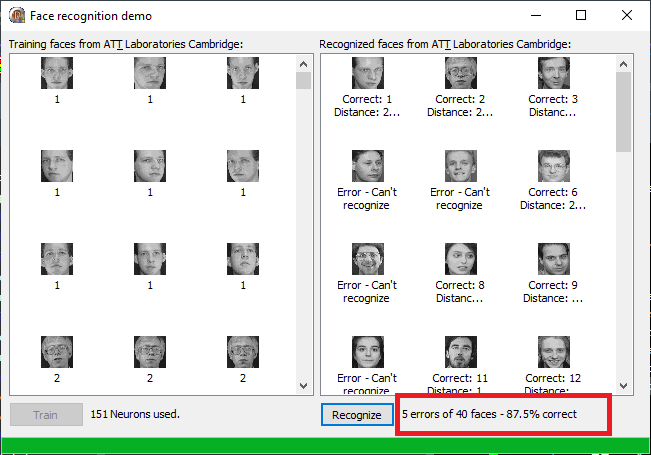
Llegados a este punto entrenamos la red y pulsamos el botón "Recognize" y comprobamos que ha reconocido 35 caras de 40 lo que representa un 87,5% de fiabilidad, ¡no está nada mal!
Tengan en cuenta que lo primero que hay que hacer es un preprocesamiento de las imágenes, ya que todas tienen que tener las mismas medidas, hay que convertirlas a b/n, etc.. y que cuanto más imágenes se tengan de cada persona mejor...siempre dentro de un límite para no llegar al
sobreentrenamiento de la red, ya que en ese caso se produciría una tasa de error mayor.
Como ven es muy sencillo hacer un reconocimiento facial con los componentes MITOV.
Espero que les haya gustado el post.
Código fuente e imágenes
Suscribirse :


 Weiterlesen...


 Antwort


 Linear-Darstellung


